Pages

Monday, November 21, 2011

Online Extravaganza!!


Crazy great deals going on in my online store!!! Check it out while it lasts!!!


Things to remember:
  • Discounted digital downloads are only available on online orders.
  • There is no minimum purchase required to participate in this promotion.
  • For product bundles, you must use the bundle item numbers provided.
  • Additional products from current catalogs may be purchased on the same order.
  • Discounts range between 20 and 60 percent.
  • Discount shows when item is added to your cart.
24-Hour ONLY Special
Monday, November 21
Regular $29.95 ~ MONDAY ONLY $23.96
#122334

Regular $16.95 ~ MONDAY ONLY $13.56
#125152


Saturday, November 19, 2011

Computer issues...

Hey everyone! I know, it seems I have been a total slacker.. well I haven't really!! I do have some great projects to show, but I have been having a few computer glitches, that have stopped me from posting pictures! So, my wonderful geeky husband, is going to reload my entire computer. I have been in the process of backing up things I need, while trying not to back up too much, or else I may end up re-installing what is causing the issue!

With that said, I am hoping by the end of Sunday I will be back up and in business again!
Thanks for being patient!

Craft on!
Jean

Monday, October 3, 2011

Keeping Warm with a Card

Yes! My computer issues are over! Back to work.

As a demonstrator I am apart of a great Stampin' Up! group called the Shamrock Stampers, headed by the fabulous Erin Barker. She had a meeting with us a little while ago and we did a shoebox swap. For those unfamiliar with this, its when you design a card, then bring enough materials for each person to make the card as well.  This is the card that I designed for our swap! I have seen a few "fireplace" cards, but I wanted to do my own version.  This is a pretty time consuming card, but not hard at all.

Here are the measurements of card stock you will need.
1 - 5 1/2" by 8 1/2" scored in half of Early Espresso
1 - 5 1/2" by 1" of Early Espresso - all edges rounded with corner rounder punch (top of fireplace)
1/2" strips of Cajun Craze and Cherry Cobbler - cut into sections for the bricks
Scrap of black - slightly more then 1 1/2" by 2" - so that it is even with the 3rd row of bricks
A couple scraps of Early Espresso - crumbled and rolled into logs

Fold the large portion of Early Espresso on the scored line - this is your card. I cut my strips of cherry cobbler and cajun craze to brick sizes then used some cajun craze ink and sponged the edges. This gives the bricks more dimension.  Wear gloves if you don't want inky fingers!  I can be a bit "obsessive" about my cards (my friends will probably roll their eyes at me now..) so I laid out my bricks before I glued them down. I used a glue stick or liquid glue so that it dries. Snail will stay perpetually sticky and if you don't cover it with a brick, your card will stick! I laid out my bricks and my black square so that everything was even. Don't forget that for a true brick look, you don't want your brick spaces to match up - as in where there is a space on the lower line of bricks, make sure a whole brick is above it. I then took the rounded corner piece of early espresso - crumbled it up, flattened it out, then took some early espresso ink and kind of roughed it up. Its hard to see in the picture, but it gives more dimension to the fireplace top. Glue that down, with a piece of Bakers twine tucked into the sides. This hides the end of the bakers twine and helps it stay put. Take your early espresso scraps and roll them up and squish a little to make logs. Use some more mustard and pumpkin pie scraps and cut out flames using the Build a blossom punch (different flowers) then sponge some pumpkin pie ink on the edges. Glue them down, then glue down your logs. Use various DSP and colors to make your stockings, and punch out with the Stocking Punch. Use dimensionals to adhere the stockings to the card, then use the mini clothespins to make it look like the stockings are hanging on the string. Put some TomBow glue along the top and sprinkle Mica Flakes on. I then used scrap pieces of Cherry Cobbler seam binding ribbon to make bows for the sides where the string is tucked back. I then used Dazzling Details to add some bling glitter to the flames and the stockings. I LOVE Dazzling Details. Its so easy to use, thick or then, it adds just the right bling!

I hope you enjoy this cozy card! And look forward to more posts as my computer is back up and working!
Craft on!
Jean

Friday, September 30, 2011

Make your own wall plates!


Bryan and I have been doing  quite a few changed around the house, including an entire kitchen facelift!  One of our more minor things is changing up our light and receptacle plates. Those silly plates get expensive! I want to do the same in my craft area but don't want to spend the money. So, why not decorate my own? I made these to plates using Stampin' Up! fabric (left, Spice Cake) and Designer Series Paper (right).  These are super easy to do.  I placed the blank plate over my fabric/paper and cut around the plate, making sure that when I fold the material over the plate, there is excess for folding behind it.  I then covered my plate in a thin layer of Modge Podge (MP) , and laid my material over the plate.  I then then brushed more MP on the back, adhering the overhanging edges to the back. You can be quite liberal with it, you want the material to stay. I then (from the back) cut the material with my scissors an "I"shape in each switch hole. Then I folded the excess inwards and put lots of MP to keep it down. You don't want to actually cut the hole out, as then you will see the blank plate.  Cover the front with MP as well now. Then poke the holes for the screws with a pen. Do this after putting a layer of MP on the front so that the MP helps stick the material in the hole. After it dries, put at least 1 more layer. If you don't want to see brush or sponge marks in the MP, put another layer or 2 of MP, then use fine sand paper and sand the MP smooth. Make sure you have at least 3 to 4 layers of MP though, or you could sand through to your fabric/paper!


Hope you enjoy!!
Craft on!!
Jean

Monday, September 19, 2011

Fabulous Changes!

Just wanted to update everyone with some information. I will be redoing my blog with a slightly different look. Same info, same posts, just a more eye appealing format. This past year has been great for me, Paper, Batter, & Stitch, and my Stampin' Up! business. I have had the help of some great people to design my banner, and other great promotional items. I also have left over items from the Apple Harvest Festival that I will be selling on Etsy. I will be doing these updates and posting my items on Etsy so stay tuned!!!

Thanks, and Craft on!!
Jean

Saturday, September 10, 2011

Another Craft Show!

So I have been quite busy lately getting ideas and projects together for an upcoming craft show, the Apple Harvest Craft Show in Winchester, VA. I am excited and nervous!  So I thought I would just pop on here for a quick post to show you some things I have been working on. Not sure what I will definitely do or not, I am seriously running out of time though!!!  Feel free to leave me comments about what you think I should definitely sell!
Hope you enjoy!!
Craft on!
Jean


Monday, September 5, 2011

Can't wear this onsie!

For my September Stamp Camp, our theme was Fall and Babies! It seems like everyone I know is having a baby this fall! So I thought how nice it would be to do a baby card. I LOVE Onsies. I think they are just the epitome of babies. And I love our new Button Buddies stamp set! I used the Button Buddies set for the pacifier and used Subtle Buttons with Lucky Limeade and Wisteria Wonder ink. The bear and blocks came from the Little Additions stamp set, with Chocolate Chip, Island Indigo, Lucky Limeade, Bashful Blue, Pretty in Pink, and Wisteria Wonder inks.  The first thing I did was searched the net for other peoples templates. Why reinvent the wheel right? Well I found a billion of them! So, I looked at what was easiest, and which ones I saw the most. So here are the easiest instructions I found!  1. Cut out your paper (I used the Nursery Nest DSP) to 4 1/4 by 11", then score at 5 1/2". Fold in half. 2. Measure down from the fold on both sides and make a mark at the 1 3/4" point. Then from those marks, measure in 3/4". Cut in to the 3/4", then down diagonally to the corner. This gives the shape of the onsie. I used my paper cutter to do the diagonal cut, then paper snips to cut the straight part in (armpit part). 3. Use your 1 3/4" circle punch to cut out the neck hole, then at the bottom corners for each leg hole.  Since I used DSP, these punch will cut through both sides at the same time. Using card stock liked hat is not so much fun, as it doesn't usually go through cleanly.  To make the ruffles in the arm and leg sections, I punched a 1 3/4" circle in Lucky Limeade and Wisteria Wonder paper, then used my large Scallop Circle punch and centered the hole in the middle of the scallop circle punch and punched. This gives you a ruffle that will perfectly fit the holes! I was able to use to circles for one card.  My middle section I cut a strip of paper about 2 inches wide and used the scallop trim border punch on both sides. I glued it to the card and trimmed off the extra. Stamp away and TaDa!!

Hope you enjoy! More to come later today..
Craft On!!

Sunday, September 4, 2011

Back to School for Teachers Too!

 So I love back to school time! I love seeing my kids (my students) after the summer break. I love hearing their stories. Since I am a Special Ed. Teacher that works with intellectual disabilities, in a Life Skills based program, I keep my students year after year, until they age out (22), or graduate. Sometimes up to 7 years! So I truly do miss them over the summer!  But I also miss my coworkers, as we are all often too busy with our own families to do much visiting. So I made everyone some cute back to school presents. First, I made these cute backpacks with matching pens! I love the RSVP pens because you can slide slips of rolled Designer Series Paper (DSP) into them and it changes there whole look. I created my own template for the backpacks, then used the top note die for the lid,  and the mini envelope die for the front pocket. I used velcro to keep the top shut.  The pen even fits inside.  See my previous post on rosettes to learn how to make the rosette!  I used one sheet of 8 1/2 by 11" Pool Party card stock for each backpack. Its all about the measurements! I will post a tutorial if anyone is interested! I need to take some pictures though, as a few things can be tricky to explain without pics! But it really is easy. I just figured out how deep I wanted it and made folds to accommodate them! Then I put a back of mini sticky notes in the front!


The next thing I made everyone was 2 bookmarks. Here is a picture of all of them, and everyone got random picks. I simply used the AtoZ stamp on some Pool Party CS, then used the smaller scallop punch. Then I used a variety of back to school stamps, mostly from the new set, From Your Teacher, but also from a retired set, and stamped them on Whisper White, then using the 1 3/8 circle, I punched them out. I used Calypso Coral, Real Red, Peach Parfait, Daffodil Delight, and Always Artichoke for my inks. I used the thick glue dots to adhere the circle to the scalloped circle with the paperclip in between. This keeps them nice and snug together, while still leaving some pliability to the bookmark.


 I also made a Welcome Back sign using the Perfect Pennants die and the Big Shot. I used the large triangle as well as both the doily shapes. I used a variety of current and retired Stampin' Up! blue colors. Unfortunately I did not have any blue DSP, so I used some leftovers from another set of paper to make my rosettes. Then used Very Vanilla letters overtop!! I used our twine to string them together (after punching 1/8" holes in each corner).

I sure hope you enjoyed checking out my projects!

Craft On!!
Jean


Monday, August 29, 2011

Pockets, Scratchin', and Sniffin'!!

Sounds weird huh? Well they come out to be two pretty neat cards! The first card is one that my wonderful upline Anne did for a workshop. She changed it from a pocket card in the new Idea Book and Catalog. I then altered it a bit since I didn't have the same ribbon or embossing folder.

The card stock used is Very Vanilla, cut to 4 1/4" by 5 1/2", the measurements of our envelopes. Then you need to seal a Very Vanilla envelope. Then trim off the side so that it opens on the side. Turn it so that it goes the long way, and through the new opening cut out a 1/2 circle using the 2 1/2" circle punch, but only on the front side of the envelope. Then run through the Big Shot using the Elegant Lines embossing folder. We then cut out the large flower from the Fun Flowers die using Spice Cake DSP, and the daisy looking flower from the Blossom Party die using Very Vanilla. We layers them then poked a hole in the middle using the paper piercer and put a Vintage brad through it. Punch a small hole in the top of the cut piece of Very Vanilla CS and tie a ribbon through. We used half a strip of striped cross grain. I used Chocolate chip, a retired color, but Anne used Early Espresso. Then slide the card stock into the envelope pocket. Put a large glue dot on the back of the flower and position it in the 1/2 circle space so the glue dot doesn't touch the envelope, but keeps the flower on the outside of the envelope, while actually being attached to the card stock!  Hence pocket card! The card slides into the envelope pocket!  I then used some new Dazzling Details to add some bling!

So my next card is a scratch n' sniff card. I did a pretty popular summer card, the popsicle card. I have seen many variations on this. I used Real Red and Pool Party for mine. I also did my scallop circle larger then a lot I have seen because I wanted to use the Cherries from the Button Buddies set. So the first thing is the card is cut to 4x 5 1/2  then scored down the middle. I then rounded the corners and used a scallop circle to put the "bite" in.  The bite is on both sides. I punched one side, lined them up then punched the other. DONT punch both at the same time, it won't work!  I dabbed my cherry stamp into Versamark, covering only the cherries. I then used Garden green marker to color the stem. Stamp it onto a piece of Whisper White. Cover the cherries with a mixture of 1/2 sugar free cherry drink mix (like Sugar free kool aide or something like that), and slightly more then 1/2 clear embossing powder. I have a little scoop I use, and I did 1 1/4 scoop of embossing powder and 1 scoop drink mix.  Cover the cherries, tap off the extra, and then heat with the heat gun until it looks glossy. Cut the cherry out using the large scallop circle punch. Then glue it to a 2 1/2 punched circle of Pool Party. I used dimensionals  to attach to the card.  Now scratch the cherries and you will smell cherry!

Hope you enjoy!!
Craft on!!!
Jean

Sunday, August 28, 2011

I am going Rosette Crazy!


So, with many other demonstrators out there, I am going simply crazy for Rosettes! When my upline Anne decided to do a large one on its own for a workshop, I knew I had to do it too! So, for my Hostess Club meeting, I pulled out my new Simply Scored and our gorgeous new Spice Cake DSP from the new Holiday Mini!

These larger rosettes are made just like the smaller ones that I gave details about in my last post about the Domestic Goddess DSP wreath, with a few variations.

So first thing, you need to cut two strips of 3 1/2" DSP. Then along the long side, score at 1/2" in. Fold over and tape down. This is how the outer edge of the rosette is a different print, its the backside!  Then you want to have 1/4" folds, so starting at 1/4", score every 1/2" (at 1/4", 3/4", 1 1/4", etc. ) on one side, then flip over and starting at 1/2", score every 1/2" again. Once both strips are scored, fold away! Tape the ends together to form a circle. I then cut a 2 1/2" circle using our punch with Crumb Cake paper, and instead of using hot glue, I used a large 3d glue dot. You know, the goober ones? With a little extra tape and push your rosette down onto it. Works great!  The hard part is now over!! I then punched out of Crumb Cake CS, a large scallop. I then used the new set, Gently Falling, also from the new mini, and used the outline stamps and Early Espresso ink to stamp a leaf, a whirly seed  pod, and an acorn. Then I used Pool Party ink, and stamped over the leave outline with the fill in leaf. I made the tag with Pool Party CS, and Early Espresso ink. I used this Laughter saying from Word Play stamp set, and another whirly seed pod. I cut out the tag by cutting a strip of paper to about 1 3/8 wide, and feeding half of it into my large tag punch. That way the top is still cut like the tag, but it is longer (pull the bottom of the paper up through the punch so that only the top cuts) I used some of our hemp twine with the new Large Buttons, again, from the mini,  and tied the tag to the button. I glued it all together using another goober glue dot!!  Hope you enjoy and have fun with the Simply Scored!!!

Fold On!
Jean

Thursday, August 11, 2011

Accordion Rosettes + Domestic Goddess = LOVE!

I am IN LOVE with Stampin' Up's new Domestic Goddess suite, especially the Designer Series Paper. Bryan and his dad recently finished my laundry room (yay!) so it is my task to decorate.
The first thing I did when I was able to preorder from the New Holiday Mini (goes live Sept. 1st), which you all will LOVE, is order the new Simply Scored! I am just beyond happy that Stampin' Up! made their own scoring tool. And it is definitely better then the Martha Stuart or ScorPal ones! Wait until you see it!

I made this wreath using Domestic Goddess DSP, Basic Gray Card Stock (CS), Daffodil Delight CS, Calypso Coral (CS), Pool Party (CS), a variety of buttons, specifically the Brights Collection and Itty Bitty Clear Buttons, our new mini clothes pins, and Paper Daisies. I used varying sizes of circle punches as well. No need to buy anything specific for the base either, I just cut out a cardboard circle! That way it lays flatter against the wall.

To make a rosette, you will cut a strip of paper. To only need 1 strip of 12inches, you don't want to make it any wider then 1 1/2 inches. The wider, or larger you want your rosette, the longer the strip needs to be. All of my larger rosettes are actually 24inches long, I glued two 12inch pieces together.  Then you want to score along the strip. I do score lines every 1/2 inch and every 1/4 inch. The rosettes that seem to have more folds are the 1/4 inch folds, the larger ones have the 1/2 inch folds (***see below for special tip!). Once done folding the strip like an accordion, glue the two ends together, to make a ring. Punch out a circle of paper (doesn't matter the color, since this is the back of it) and put hot clue on the circle. I use hot glue because it makes the rosette very secure and can withstand some pull and tug. Push the center of the accordion ring down, as you do so, the other side should be splaying out a bit, and will look like the above rosettes. You can either push the center down onto the hot glued circle, or push it down, then place the hot glue circle on top. Either way, on the bottom side should be your circle with the glue to hold it all together. Then decorate as you like!! As you see above, I used paper, flowers, and buttons to decorate the front of my rosettes. Then I hot glue'd them all together on my cardboard circle. Then I added a few cutesy mini clothespins. And ta da! My first laundry room decoration!!!

*** scoring tip
If you are using a scoring board, like the Simply Scored, it is easier to fold the strip accordion style if you score on one side of the strip for every other score line, then flip the strip over, and do the other score lines. For example, if scoring every 1/2 inch, then on one side score every inch, flip over, and score the alternating every inch. When you go to fold, the paper will want to fold in the direction of the scoring, making the back and forth accordion style much easier!

Hope you enjoy!
Craft On!!!
Jean

Tuesday, July 19, 2011

Coupons Coupons Coupons

I had the privilege of participating in several organized swaps while at Stampin' Up! Convention. One of my faves was a 3d swap. I thought since coupons are the rage right now, that a coupon holder, sized for a purse, would be perfect!! Download PDF Here or see the following directions and pictures!


Supplies and Tools
Textured Crumb Cake Card Stock
Baja Breeze CS
Daffodil Delight CS
Perfectly Plumb CS
Wild Wasabi CS
Rose Red CS
Rich Razzleberry CS
Pocketful of Posies Designer Series Paper (DSP)
Basic Pearl Accents
Big Shot
Top Note Bigz Die
Blossom Bouquet Triple Layer Punch
Scallop Trim Border Punch
Round Tab Punch
Two Way Glue Pen
Tombow Multipurpose Adhesive
Sticky Strip
Velcro Dots

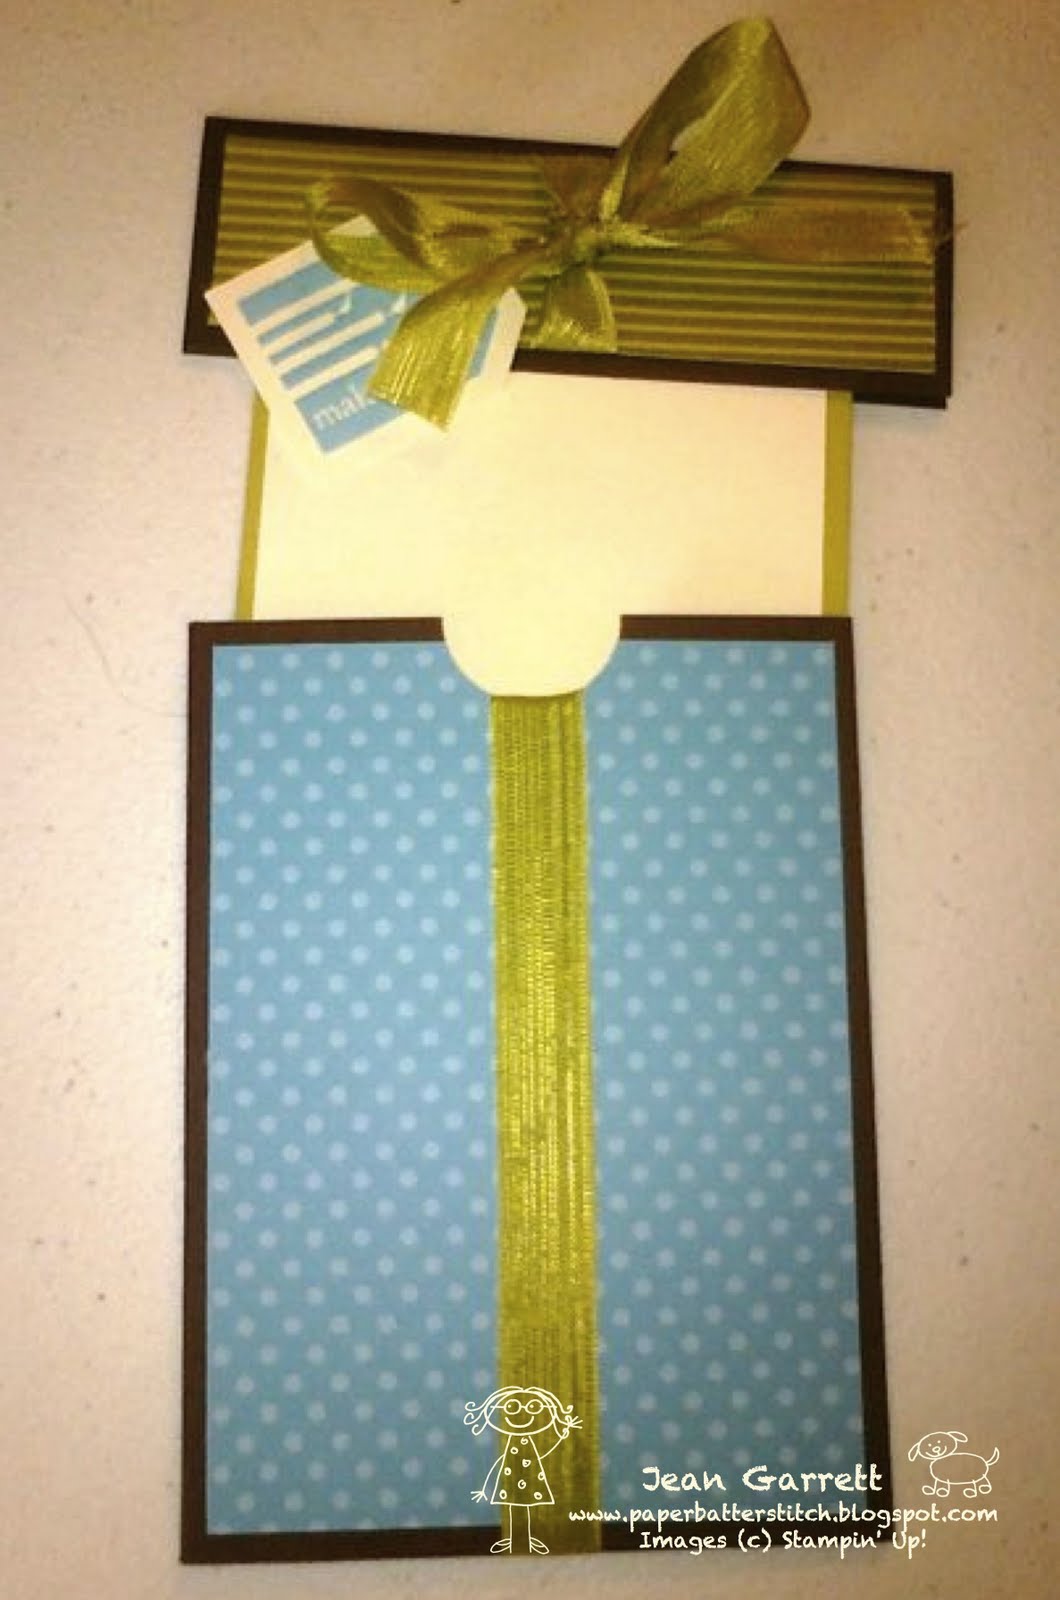
1.     Cut Crumb Cake CS to 7 1/2 by 7 1/2 inches.
2.     Use the smaller extra piece cut off and glue it to desired piece of DSP using Tombow Glue – let dry a little bit then cut out with the Top Note Bigz Die and the Big Shot. This is the top portion of box.
3.     Cut out 5 pieces of Crumb Cake CS to 3 1/2 x 5 7/8 inches.
4.     Using Round Tab Punch, cut out one tab in each of 5 different color card stocks. Fold in half, then using Tombow glue to top (longer side) of each of the 5 pieces of cut cardstock – layer them so that they are each easily seen when stacked together (like file folders).
5.     Score the 7 1/2 x 7 1/2 piece as follows…
                               Score at 3 1/2 “ then at 4 “. Turn paper so you are now working perpendicular to first    score marks.
Score at 6 3/4” then at 7 1/4”. Turn paper so you can score the same on the opposite side. This will give you score marks that are 1/4” and 3/4” in from each side.
6.     Cut off sections and place sticky strip according to pictures provided.
7.     Fold all sections in, then take orange plastic off of sticky strip and begin assembling box.
8.     Score Top Note piece according to picture (round sections placed on 1 1/2 line then score, doing so for both side).
9.     Place to strips of sticky tape on Crumb Cake side of Top Note piece, then adhere to back side, middle, of box top.
10.  Place one side of Velcro dot on Top Note piece where the point is. Place opposite piece of Velcro on box, where you want the lid to close at.
11.  Using Scallop Trim punch, cut out a strip of matching DSP, and trimming paper so that the solid part of the border is about 1/4  inch wide. Glue to bottom of box front, scallop side up.
12.  Using the Blossom Bouquet Triple layer punch, punch out card stock and DSP, set on the furthest setting to the right. You will get an outer flower piece and the middle piece with small holes. Mix and match as you wish – then glue three onto the front of the box, using Two Way Glue Pen.
13.  Place a large pearl in center of each flower, and several small pearls along Top Note lid.
14.  Place dividers inside and your done!!
Craft On!
Jean


Embossing with Jewelry!

Hello everyone! Oh my gosh am I exhausted. I just got back from our Stampin' Up! Convention in Salt Lake City, Utah, and what a blast! But I am also so very tired! One of the many times I love having summers off!
So I made several goodies for Convention, embossed jewelry just being one. So I will have several posts tonight, each highlighting something different!
My first is Embossed Jewelry. Sounds hard? Well it's not!!!! Just takes patience!
 So these first two pictures show my Hope Bracelet, featuring the Hope and Strength stamp set, and my Shamrock ring, featuring the Every Little Bit set.  These were the easiest! Just be careful because the metal can get hot! I used tweezers to hold the ring.

So I purchased the ring and bracelet at a craft store. Just blank, and plain. They are made to be adorned with jewels and such from the jewelry area. I then pressed the flat part into a Versamark pad, covered in our Stampin' Up! silver embossing powder, then heated with the heat tool until melted. It will only take a second to cool for this first layer. Use those tweezers or something else for the ring! The metal gets hot.  Then press into the Versamark again, cover with powder, and heat with the heat gun. This time you will need to let it cool a bit, as the melted powder will be soft. Once cool, press again into the Versamark, cover with powder, and heat with the heat gun. This time, quickly take your stamp and press into the melted powder. Lift carefully, and let cool! If you mess up - no fear! Simply use the heat gun to melt it again. You can always add another layer of embossing powder! Then I just added a little bling with some of our Basic Rhinestones!

The earrings are a bit different. You can purchase flat discs in the same jewelry department, however, I wanted to try something different. I wanted to use as much Stampin' Up! materials as possible. So I used a 1" circle punch, and punched out two circles of Basic Grey cardstock. I then covered one side of each with Crystal Effects, then let dry. Once dry, it gave the circles a nice plastic toughness. Then proceeded with the cardstock side, as I did above, with 3 layers of embossing, then pressing the shamrock stamp into the melted embossing powder. Once cool, I added a Basic Rhinestone, and used the 1/16th hole punch to put a small hole in the top. I used rings and earring posts from the jewelry store to finish them up! The Crystal Effects on the back really helps to make these earrings a bit sturdier, but yet they are light as a feather!

Hope you enjoy!
Craft on!
Jean

Wednesday, July 6, 2011

Shamrock Lariat Necklace

Here is a great Shamrock Lariat necklace that I created for the talented Stampin' Up! demonstrators of Shamrock Stampers! Erin, Anne, Wendy, and I are going to Convention soon!!!!  So I created these for us! You can also download here.. Download Shamrock Lariat Necklace Pattern

Shamrock Lariat Necklace 
Hooks – H (for Shamrocks)
                F (for chain)
Yarn – Lily Cotton Sugar’n Cream
                  Yarn A - Hot Green (shamrocks)
                  Yarn B - Dark Pine (chain)

ch – chain
sl st – slip stitch                trc – treble crochet
dc – double crochet            sc – single crochet

For Shamrocks (Make 6)

With hook H and Yarn A

Ch 3, join with sl st to first chain. This makes a ring.
*Ch 3, trc, dc, trc, ch 3, sl st in ring*. – repeat from * 2 more times, total of 3
Ch 5, sc in 2nd chain from hook, sl st in remaining 3 chains. Fasten off.


For necklace

With hook F and Yarn B

*Sl st into top 4 stitches of middle petal of 1st shamrock
Ch 15
Sl st into top 4 stitches of middle petal of 2nd shamrock
Ch 15
Sl st into top 4 stitches of middle petal of 3rd shamrock*
Ch 140
Repeat from * to * for remaining 3 shamrocks.
Fasten Off. Weave in end.

Craft On!!
Jean

Sunday, July 3, 2011

Mmmm Edible Stamping???

You read that right. Edible stamping. I also made my very first video! I did a post awhile back about edible stamping and  now I have perfected the technique! Plus I made a very short video demonstrating how to do it!


Hope you enjoy!

Craft on!
Jean

Saturday, July 2, 2011

Happy Birthday Cupcake!

Here is a super cute card I created for a workshop that I did today for my friend Nickie. Have  I mentioned I love cupcakes?
The colors I used for this card are Whisper White, and all the new In Colors, Wisteria Wonder (the purple), Lucky Limeade, Island Indigo, Pool Party (the light bluish), and Calypso Coral. I love these colors! I also used a bit of our Red Glimmer paper which I am happy happy to say has made it into our new Catty! To make the shape of the card, I cut a 5x10 card, folded it in half, and placed it on the Clear Scalloped Square die for the Big Shot. But when I placed it on the die, I did not put the fold over the edge of the square, instead I sort of had it right underneath where it would cut, that way when I put it through the Big Shot, it only cut on the 3 sides, leaving the fold!  The whisper white piece on the inside and the outside is the same size, 3 3/4 x 3 3/4. I then use my Build a Cupcake punch and cut out one cupcake from each of the 5 In Colors. Then just mix and match pieces, gluing them onto the white piece.  I had some hang off, some sideways, get creative! I used Calypso Coral ink and our Swirls and Curls Summer Mini Hostess Stamp set to stamp Happy Birthday at the bottom. I trimmed off all the cupcakes that were hanging off the white piece. Then I ran it through the Big Shot with the polka dot embossing folder, with the dots popping up. I glued a small washer underneath the embossed cupcake/white piece before I glued it to the card. Then I used Lucky Limeade and the larger scallop circle punch, layerd that with Island Indigo and the 1 3/8 circle punch. I think punched out two more cupcakes for the cupcake in the middle on the circle and scallop circle. I glued a magnet on the back of the middle cupcake piece so that it comes off and is a cute magnet! Thats why it is popping off of the card!

Let me know if you have questions, hope you enjoy!
Craft on!!
Jean

Sunday, June 26, 2011

Bookmarks you will love to use!

I am a very avid reader. My mind often goes toward books, so when I needed a quick project for a Summer House Party gathering, I immediately thought of bookmarks! If you haven't been to one of these House Party gatherings, they are so much fun! My friend Rachelle had one and invited me to bring my Stampin' Up! stuff! These gatherings are huge because the hostess has people from a variety of direct selling companies come at one time. So I was there with Mary Kay, Thirty One, Premier Jewelry, Tupperware, and several others. I even behaved myself! I knew our new catalog was coming soon so I didn't want to spend all my money!  Here are some pics of the bookmarks I had for people to make. I love punch art but did not have the time to figure these up on my own, not completely, so I did a search on our demonstrator site and found some by Becky Robinson, that were so cute! I used hers as an inspiration. I think some might be exact, but others I had to switch out punches to match what I have.

Let me know if you have any questions as to which punches to use! Most are easy to figure out if you have that punch.

Here are all but the cupcake and flower ones. The owls, cupcake, and flower ones are just one punch, the Owl punch, the Build a Cupcake punch, and the new 3 step Flower Punch, just used different paper to put it together.

I designed the Koala myself, for my friend Nikki, who is a huge Koala lover!

Hope you enjoy!

Craft On!
Jean


Monday, June 20, 2011

Edible Rubber Stamping!!!

Long time no blog! I have many things I want to share since I have been in "summer hibernation" mode since school ended. Usually for 1-2 weeks after school lets out and I start my summer break I hibernate in the house and don't go anywhere! I catch up on reading, crafting, whatever I WANT! lol.
Every year I do a Luau with friends right before the end of school. I wanted to do something different, so I decided to mix my love of rubber stamping with cupcakes!  
 Since I did this sort of last minute - I didn't get the edible markers that you can use to write on cakes. I think that if I had those it would have made a cleaner image - but as soon as I try it out - I will share!!!
I started off with a white sugar sheet (designed for the Cricut Cake, but they make several types now). Fondant or gumpaste will work too!  Then I took food color spray and sprayed it on a paper plate. Then I stamped my stamp into the color, coating it well, then stamped it onto the sugar sheet just like you would with normal ink and paper!  I tried liquid food coloring, but it is just too liquidy and does not stick to the stamp well. Thats why I think the markers might work well. But if not, the spray worked great! I let it dry for a minute, then cut out all my pieces.
I know some people who use stamps to press into fondant and they use those stamps only for food to keep them food safe. I had only used one of these previously and I sterilized it well before using it. Since this was a personal project, cleaning it seemed fine to me. But if you will be using your creations for commercial use or for any other non personal use, I would recommend only using the stamps for food - keeping them separate from your actual crafting stamps.

I will blog more soon!! I have some cute crochet items I have made and some adorable bookmarks!

Craft On!!!
Jean

Thursday, June 2, 2011

Fathers, Hope, and some Bling!

 I know its about time right! I posted these on Stampin Connection awhile ago and just haven't gotten to posting them here! I created these for my May 28th camp. Wow was it crazy! There were 11 fabulous ladies! We had tons of fun but it was quite hectic.

So our first card is for Fathers Day! I used Versamark, the splotch stamp from French Foliage (but others used just a Versamark  marker to make dots and splotches by hand) and black embossing powder, then used the heat gun to emboss. The colors I used were Not Quite Navy and Basic Gray I used aluminum foil, the big shot, and the diamond Impression Plate to make the one side of the swing card, then crumbled up a piece of Basic Gray and sponged it a little with matching ink for the other side.
 I got my swing card instructions from splitcoaststampers.com.

For my Hope card I used Crumb Cake, Very Vanilla and Pink Pirouette. I used the Mother of Pearl technique for the butterfly, H Hope, and side Vanilla piece. It is so easy! You just scrunch up some plastic wrap, dab it in some Frost White Shimmer paint, then dab onto the paper!  I then used some Pink Pirouette ink and sponged it on the butterfly, but its kind of hard to see in the picture. I also roughed up the edges of the middle vanilla piece, but those are hard to see has well.

Our last project was fun and the younger girls loved it! I don't currently have a Crop a dile, so I had to purchase bottle caps with holes already punched in. But you can do these with any bottle caps! I then used the 1 inch punch to punch out some DSP, used a little Crystal effects to stick it to the bottle cap, then covered the inside well with the Crystal effects. I put a pinch of glitter, then gently put a rhinestone on top. I let it dry overnight. Don't put the Crystal Effects too thick or else it won't dry clearly. Then used some seam binding ribbon as the necklace part!

I will be posting some cute bookmarks soon so stay tuned!

Craft on!!
Jean


Saturday, May 14, 2011

Orange Creamsicle Cupcakes!

So every month we have a birthday party for the kids in my classes who have a birthday at some point in that month. We used to do individual ones, but with a group of 16 thats a lot of birthdays!  The kids love cupcakes and they are much easier to deal with when serving a bunch of kids!  So this lately I have been dying to try and make Orange Creamsicle cupcakes. Well I usually start off with a basic cupcake recipe and edit from there, but, silly me used up all my flour and cake flour at my Cupcake Challenge a few weeks ago and didn't realize it! So I was forced to mess around with a vanilla cake mix. I was pretty nervous. I haven't done that! So here is my recipe for the Orange Vanilla Cupcakes and the Orange Buttercream Frosting!! It was a huuuuge hit and they were very yumm! Even my friend Stephanie who doesn't like Creamsicles liked these!

Orange Vanilla Cupcake

1 box vanilla cake mix
1/4 cup fresh orange juice (squeezed right from the orange!!)
1 tbsp or so of orange zest (I am bad with not measuring!)
1/3 cup oil
1 tsp vanilla extract
3 eggs
1/2 cup heavy whipping cream (not whipped)
a few drops of yellow and red food coloring to give a nice orange color - not required though

Just mix all together, then fill lined cupcake tins. I baked at 350 deg. F for about 15 min.  Pop them out to cool when they are done.

Orange Buttercream

1/4 cup fresh orange juice (squeezed right from the orange!!)
1 stick unsalted butter at room temp.
1/2 cup shortening - I used the white shortening sticks, not butter flavored
1/2 tsp vanilla extract
1/2 tsp orange extract
4 cups powder sugar

I creamed all the ingredients except the sugar first, then added the sugar about 1 cup at a time. You can add more sugar or less  depending on the consistency and the sweetness that you prefer. The frosting I did came out light and fluffy, which worked great for the Creamsicle feeling!

Hope you enjoy!!!

Bake on!!
Jean

Wednesday, May 4, 2011

Mom's, Fun Fabric, and a Birthday Twist!


 I feel like it has been forever since I posted anything! Here are the 3 projects we made at my April 30th Stamp Camp. We made a bright flowery Mothers Day card, a fun birthday card, and a decorative plate for a pillar candle. 
For the Mothers Day card I wanted to use the new DSP from the Summer Mini Catalog, Beyond the Garden.  I love this paper! But since it is so bright and beautiful, it is challenging to try and use it all together! Love it, but definitely a paper to use more solids with than prints.  However, I did discover that by placing some of the bolder patterns with one of the more gentler patterns, it looked great!  I paired the paper with So Saffron for the main card, Wild Wasabi and Rose Red for the background pieces behind the DSP, and Rose Red and Garden Green for the tulip.  I used the Blossoms Petal Punch to make the tulip. The measurements/instructions for making this cute trifold card look hard, but are very easy! 
Main Color - 10 1/2" x 5 1/2" - place long side parallel to your cutter, and placed at the 1/2" mark, then cut from the 1 3/4" line to 8 3/4" line.  Flip and do the same on the other side. This gives you the pop part in the middle. Then score just the middle section (inside of cuts) 1 3/4" in from both sides. Score the entire length 3 1/2" from both sides. When folding - follow picture - its just folding the opposite way for each section.

2nd + 3rd Color - cut 2 at 1 5/8"x1 3/8" and 1 at 1 5/8"x 5 3/8"
DSP 1 and 2 - cut 1 at 1 3/8" x 5 1/8" and 2 at 1 1/4" x 1 1/2"
DSP 3 (middle section) - 2 at 1 3/8" x 3 3/8"

The candle plate is super easy! I love adding fabric to plates and bowls to jazz them up for parties and make nice decorations. For this, I measured my candle plate, and it is 6"by 6", so that is what I cut my fabric to.  I used spray adhesive to coat the back of the glass plate. I placed the fabric, right side to the glass, in the corner, and then stretched the fabric over the bottom, then stretched the fabric over the rest of the plate. The fabric may go over the edge slightly, just trim it.  Then I used glossy modge podge and painted it on the back, sealing the whole thing, including the edges. This keeps the fabric safe and hand washable, and seals the edges so they don't fray.  I did 3 layers. If you do this with a plate that sits up, you can also use more layers and some sand paper to smooth it out more if you want to make it smoother. This is sitting flat so no need to get fancy! I used the Spring Vintage Fabric and it looks great in my living room!

The last thing we made was a birthday card. I got the inspiration for this card at http://walkruncraft.blogspot.com/2011/04/birthday-present-card.html. I found it through a great website for Demonstrators. Mine is slightly different in size and design, but hers is way better. I just saw the picture and recreated it on my own because I had some extra stuff I wanted to use, but her instructions are great! 

I plan on trying out doing a video tutorial soon! I am 1 of 2 Junior Class sponsors at the high school I teach at. We have prom this weekend, so I am a bit crazy with that. But soon, very soon, I will be breaking out my camera!

I am also getting super excited about Convention! Myself, and my two uplines are going to the Stampin' Up! Convention in Salt Lake City in July! I am getting so excited, especially now that hotel and plane stuff is all situated. Yay!

I promise to update more often as I will have lots more time soon!

Craft on!!
Jean